Creating Your First Endpoint
Learn how to create a webhook endpoint with automatic signature verification using the hookVM web interface.
What You'll Learn
- How to create an endpoint in the Flow section
- Selecting source types for automatic verification
- Configuring signature verification
- Setting retention periods
- Best practices for endpoint configuration
Step 1: Navigate to Flow
- Log into your hookVM account
- Click Flow in the left sidebar
- Click the Create Endpoint button
Step 2: Configure Basic Settings
Endpoint Name
Give your endpoint a descriptive name that indicates its purpose:
Examples:
Stripe Payment WebhooksGitHub Repository EventsSlack NotificationsCustomer Order Updates
Best Practice: Use clear, descriptive names that make it easy to identify the endpoint's purpose at a glance.
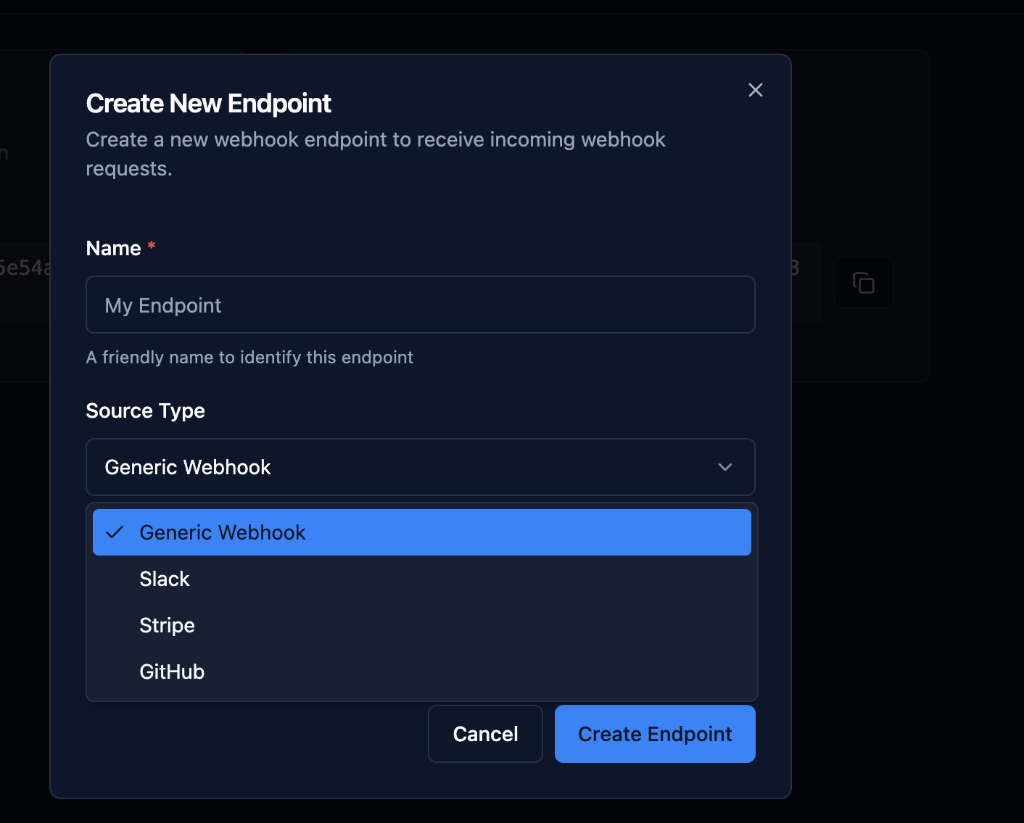
Step 3: Select Source Type
Choose the webhook source for automatic signature verification.
How Source Types Work
hookVM supports automatic signature verification for popular webhook providers. When you select a specific source type:
✅ Automatic Verification: Signature validation is enabled automatically
✅ Zero Configuration: No code needed in your application
✅ Security Built-in: Invalid signatures are rejected automatically
✅ Provider-Specific: Uses the correct verification method for each source
Choosing a Source Type
Supported Provider:
- Select the specific provider from the dropdown (e.g., Stripe, GitHub, Slack)
- Signature verification is automatically enabled
- Enter your webhook secret from the provider
- hookVM handles all validation
Generic Webhook:
- Use for custom integrations
- Use for internal webhooks
- Use for providers not yet in the list
- No automatic signature verification
💡 Tip: We're constantly adding support for more providers. If your provider isn't listed, use Generic Webhook and check back for updates!
Step 4: Enable Signature Verification
When you select a specific source type (not Generic), signature verification is automatically enabled.
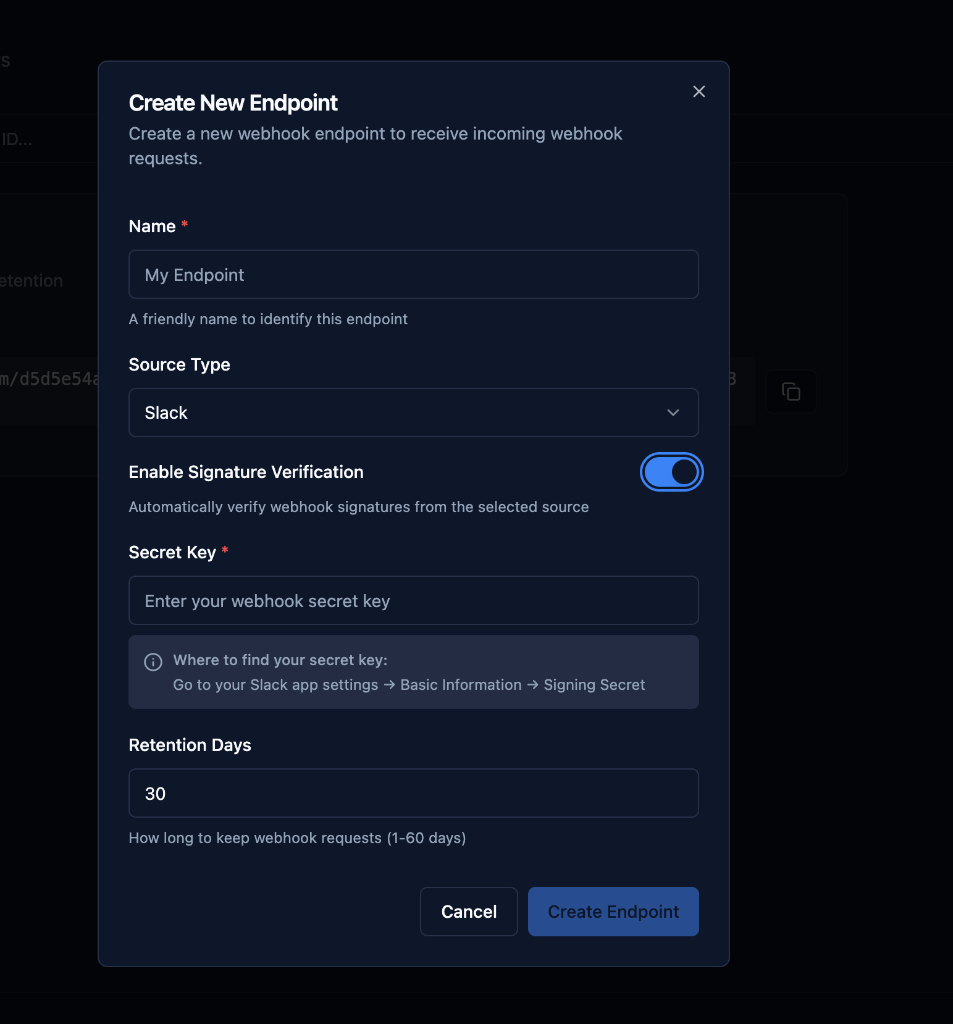
What Happens Automatically
- Toggle Enabled: "Enable Signature Verification" is turned ON
- Secret Key Field Appears: Enter your webhook secret
- Helper Text Shown: Guidance on where to find the secret
- Automatic Validation: hookVM verifies every incoming webhook
Example Configuration
Source Type: [Your Provider]
Enable Signature Verification: ✓ (auto-enabled)
Secret Key: [Enter your webhook secret]

Where to find your secret key:
Check your provider's webhook settings or developer documentation
Security Benefits
✅ Prevents Spoofing: Only authentic webhooks are accepted
✅ Data Integrity: Ensures payloads haven't been tampered with
✅ Zero Code: No manual verification needed in your app
✅ Automatic Rejection: Invalid signatures are blocked immediately
Step 5: Configure Retention Period
Set how long to store webhook request data.
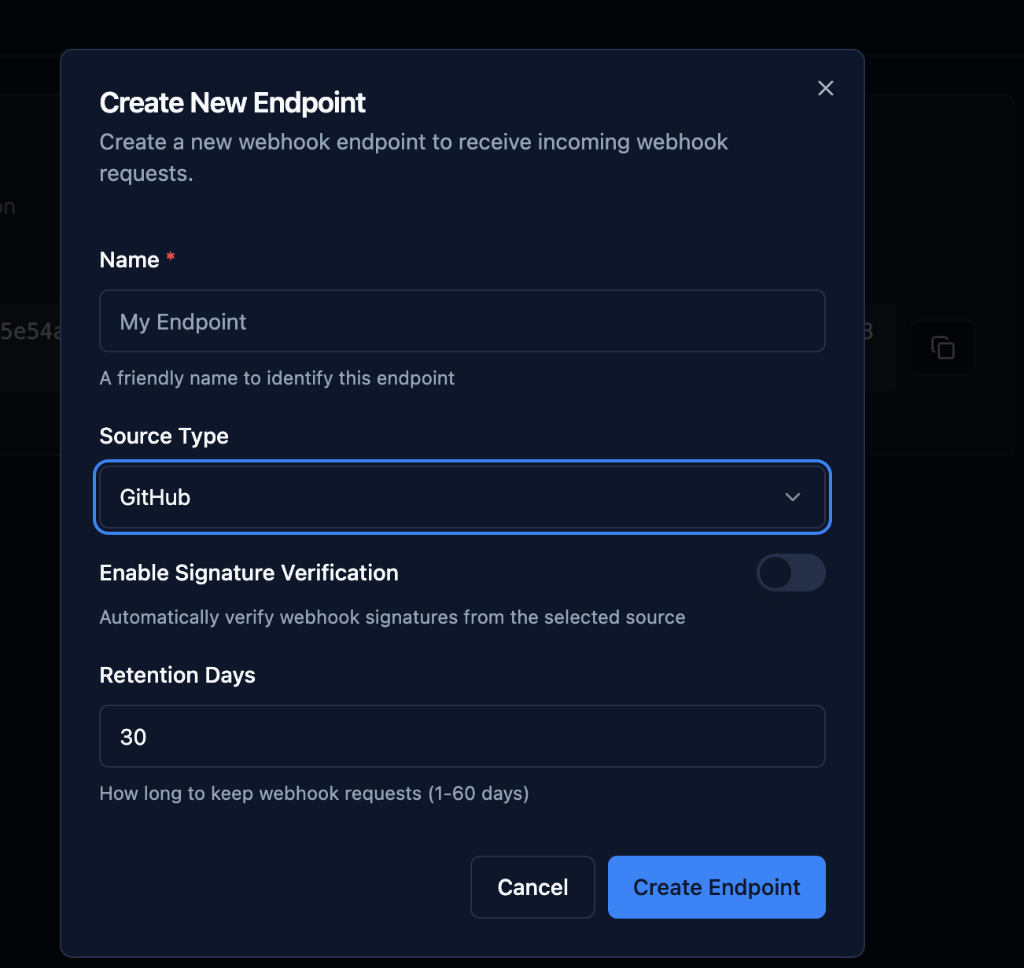
Retention Settings
Range: 1-60 days
Default: 30 days
Description: "How long to keep webhook requests (1-60 days)"
Choosing the Right Retention Period
Short Retention (7 days):
- High-volume endpoints
- Privacy-sensitive data
- Minimal storage needs
- Quick data cleanup
Medium Retention (30 days):
- Standard use cases
- Sufficient for debugging
- Balanced approach
- Recommended default
Long Retention (60 days):
- Compliance requirements
- Audit trail needs
- Historical analysis
- Long-term troubleshooting
Important Notes
⚠️ Automatic Cleanup: After the retention period, webhook requests are automatically deleted. Plan accordingly for compliance and debugging needs.
💡 Tip: Start with 30 days and adjust based on your actual debugging and compliance requirements.
Step 6: Create the Endpoint
- Review your configuration
- Click Create Endpoint
- Your endpoint is created with a unique URL
What You Get
Endpoint URL: https://hooks.hookvm.com/ep_abc123xyz
This URL:
- Is unique to your endpoint
- Receives webhook requests
- Validates signatures automatically (if configured)
- Stores requests for the retention period
Step 7: Get Your Webhook Secret
For signature verification to work, you need the webhook secret from your provider.
Finding Your Secret
Each provider stores webhook secrets in different locations. Common places to look:
Developer Settings:
- Webhook configuration page
- API settings
- Security or credentials section
Common Names:
- Signing Secret
- Webhook Secret
- Secret Key
- Signature Secret
Where to Look:
- Check your provider's webhook documentation
- Look in developer/API settings
- Check the webhook configuration page
- Search for "webhook secret" in settings
💡 Tip: The secret is usually displayed when you create a webhook endpoint in your provider's dashboard. If you can't find it, check your provider's documentation or contact their support.
Step 8: Add Endpoint to Source Service
Now configure your provider to send webhooks to your hookVM endpoint.
General Steps
- Find webhook settings in your provider's dashboard
- Add new webhook or endpoint
- Enter your hookVM URL:
https://hooks.hookvm.com/ep_abc123xyz - Select events you want to receive
- Save the configuration
Common Webhook Settings
URL/Endpoint: https://hooks.hookvm.com/ep_abc123xyz
Content Type: application/json (most common)
Events: Select the events you need
Secret: May be auto-generated or you can set your own
📚 Provider Documentation: Each provider has specific instructions for setting up webhooks. Check your provider's documentation for detailed steps.
Step 9: Test Your Endpoint
Send a Test Webhook
Option 1: From Source Service
- Trigger an event in the source service
- Example: Make a test payment in Stripe
- Example: Push a commit to GitHub
Option 2: Using cURL
curl -X POST https://hooks.hookvm.com/ep_abc123xyz \
  -H "Content-Type: application/json" \
  -d '{
    "test": "event",
    "message": "Hello from hookVM!"
  }'
Verify Receipt
- Go to Play section in hookVM
- You should see your test webhook appear
- Click on it to inspect:
- Request headers
- Payload body
- Signature verification status
- Timestamp and metadata
Common Configuration Examples
Production Endpoint (with verification)
Name: Production Payment Webhooks
Source Type: [Your Provider]
Enable Signature Verification: ✓
Secret Key: [your webhook secret]
Retention Days: 60 (for compliance)
Development Endpoint
Name: Dev Webhook Testing
Source Type: [Your Provider]
Enable Signature Verification: ✓
Secret Key: [your webhook secret]
Retention Days: 7 (short retention for dev)
Generic Internal Webhook
Name: Internal Events
Source Type: Generic Webhook
Enable Signature Verification: ✗
Retention Days: 30
Troubleshooting
Signature Verification Failures
Problem: Webhooks are being rejected with signature errors
Solutions:
- ✅ Verify secret key is correct
- ✅ Check for extra spaces in secret
- ✅ Ensure secret matches source system
- ✅ Rotate secret in both systems if needed
Webhooks Not Appearing
Problem: Not seeing webhooks in Play section
Solutions:
- ✅ Verify endpoint URL is correct in source service
- ✅ Check source service is sending events
- ✅ Ensure events are within retention period
- ✅ Check for any error messages in source service
Secret Key Not Saving
Problem: Secret key field appears empty after save
Solutions:
- ✅ This is normal - secrets are hidden for security
- ✅ Secret is saved, just not displayed
- ✅ Test with a webhook to verify it's working
Next Steps
Now that you've created your first endpoint:
- Set up relay rules to forward webhooks to your application
- Use the CLI to tunnel webhooks to localhost for development
- Monitor events in the Play section
- See usage examples for practical code implementations
Best Practices
Security
- ✅ Always enable signature verification for production
- ✅ Use specific source types (not Generic) when available
- ✅ Rotate secrets regularly
- ✅ Never commit secrets to version control
Organization
- ✅ Use descriptive endpoint names
- ✅ Separate endpoints for different environments (dev/staging/prod)
- ✅ Document which services use which endpoints
- ✅ Set appropriate retention periods
Monitoring
- ✅ Regularly check Play section for errors
- ✅ Set up alerts for failed deliveries
- ✅ Monitor signature verification failures
- ✅ Review retention settings periodically
Ready to receive webhooks? Your endpoint is now configured and ready to use! 🎉